Tuesday, December 20, 2011

Decorating for Christmas - Salvaged Iron Topiaries

Our house has an open floor plan for the living and dining areas -- these are the two major areas where we spend most of our time and where I concentrate my decorating energy.  Before the Christmas season, in the dining room, I had two of my silk topiary trees in these cool chocolate urns that I have had for ever.

When I started decorating I decided they needed a major face lift.  So one night I had this "ah ha" moment.  I envisioned old metal wire topiary's where I could close pin our annual Christmas cards.  I'm not sure if the pictures do it justice but I am IN LOVE with these two totally {not-perfect} recycled metal topiary's.  I'm thinking of keeping them all year to hold family snapshots.


Thanks to all our family and friends for sending Christmas cards this year.  Our kids love getting them in the mail and pinning them to these metal trees.


A close up of the urn and wire.  I love the patina of this old chicken wire.


Monday, December 12, 2011

Decorating for Christmas - paper garland sign

I don't know about you but I have been inspired this year by all of the paper crafts available.  The options at the craft store for fun decorative papers is staggering!  I recently purchased a round paper punch to use for my business.  I decided to use it to make a paper garland for our front entry way.  I saw this idea in a crafting magazine.  It was fun for the holidays but could easily be used for a birthday or other special occasion.  I think Happy New Year would look cool too.


You will need fishing line, paper, round punch (or if you are really good with scissors you can cut out your own circles or squares), glue or double sided tape and pre-cut letters.


You will need 2 round circles for each letter.  Place the fishing line down on a flat surface, lay one set of the rounds even spaced along the fishing line, tape or glue the line to the paper rounds.  Use a separate line for each word or else it would be too long and hard to hang.  Place the second set of paper rounds directly on top of the first set - so that the fishing line runs between them.  Next glue or tape your letters - one on each paper round. 

Attach one end of your line to a mirror, window, buffet or wall with double sided tape or removable glue dots.  (I actually tied my fishing line between two wall sconces.)  I also added a puff of ribbon to help soften the end of the sign.

Saturday, December 10, 2011

Decorating for Christmas - Block Angels

If you have read any of my previous decorating blogs you will know that (a.) we have a fireplace and (b.) my husband collects wood remnants for kindling.  Whenever I get an idea in my head for an art project my mind immediately goes to that wood pile.  Because, one of my mantra's is, "use what you have".

I really wanted to have some angels in the house this Christmas.  I came up with this cute, recycled idea.  First I used some stubby 4 x 4 end posts and Styrofoam balls.  I pounded one skinny nail into each wood.  I then found some chocolate fabric in the cupboard and decided to use that for their heads. 

I took the fabric and wrapped it tightly around each Styrofoam ball and gathered it at the top with a piece of wire.  Taking my scissors I roughly cut the fabric to form "hair" for my lovely ladies.  For eyes I used pearl pins.

For halo's I used some pearl wire and wrapped loops around my hand to form a simple circle.  I then attached it to the head with another pearl pin.


Finally we need some wings.  You can use wire hangers if you want and bend them into non-traditional free-form wings.  You will want to hot glue the wire to the back of the wood or tie a ribbon or twine around the wood inserting the wire at the back.  I finished each angel with twine to continue my rustic theme.

To give my angels a little home for the holidays I placed them in an open vintage suitcase.  Pinecones add to the seasonal look.

Tuesday, December 6, 2011

Decorating for Christmas - Fireplace

Well I am finally getting around to doing some decorating for Christmas.  First I am starting with our fireplace mantel - it is the most visible spot in our living room and a focal point of the room.  For those of you that are crafty I thought you might enjoy this paint and paper project.

I really enjoyed making my Halloween Sign for the mantel last month so I headed back out to the wood pile to look for more 2 x 4 remnants.  I was inspired to make a wood block and paper sign after seeing a really cool "Faith" sign at Designer Flower Center.

First I had my daughter help me paint the sides of each block white.  Don't worry about the wood blocks being the same height - in fact several different heights makes the sign more interesting.  Next I found some really fun paper in shades of grey and whites at the craft store.  I cut out squares of paper and glued them to the blocks.  I also picked out heavier card stock that was white and covered in glitter for the letters.  Before gluing on the letters I painted on Mod Podge to help seal the paper tight to the wood.


The following day I glued each letter to a block.  I didn't use a template for these letters I just cut them out free-hand. We then stacked the word "Merry" on top of "Christmas" and voila a fun, inexpensive sign for our mantel. 


Friday, November 18, 2011

Cool Girls with Cool Shops

I have been hearing about these two super cute shops from my friends for the past 6 months...so last week I headed my car west and to the Tower District.  I wanted to share them with you so you too might be inspired to visit these fun and locally owned boutiques.

Twee and the Frosted Cakery are both located {almost next door} on Wishon just north of Olive.  It took me a few wrong turns to find them but it was worth it!  When I walked into Twee I knew it was my kind of store...filled to the brim with fun girl stuff.  Turquoise dressers, flippy-knotty scarfs, hand-crafted cards, hand-made jewelery...I start picking up stuff that I can not live without!  I don't get out much...

Twee is owned by Melanie Davis and can be found on the web at tweeboutique.com.  They sell and showcase the wares and work of local artists. 


A whole wall of stationary...I am drawn to all of the journals...humm

They also have a fun selection of super chic baby toys, children's games and onesies...and no I don't suggest bringing your children, mine just happen to be attached to me and pop up everywhere I go!

Jewelery...one of my favorites {Ingelnook} is sold here!

Love the mall and love Target but ladies, consider getting that special friend, sister or mom something truly unique at Twee this Christmas and you just might be supporting the artist next door.  Or, you can do like me, and buy something for yourself.  I picked up a journal to record things I am thankful for, a Bordeaux fig soy candle and a glazed pottery bird dish...so fun and it felt good in my heart too.


Next to Twee you will find Frosted Cakery.  My good friend Caty first gave me one of their creations and I was hooked.  They have awesome selections like Salted Caramel {they tell me this is their best seller}, Tiramisu, Vanilla Bean, Chocolate Peanut Butter Cups, Red Velvet and there was even something that resembled maple syrup waffles with bacon...no I'm totally serious.  The Frosted Cakery can be found on the web at frostedcakery.com  Place your order for your next party...I purchased these for my barn party.  They were so yummie and gorgeous too.


Don't the kids look so excited to be out and about?  So close to cupcake nirvana yet so far....

Wednesday, November 16, 2011

Fly Girl Fly

Okay so I love my friend Kiley and I love her daughter Emily.  Emily's little word since she began talking has always been "fly"!  Yes, my friend Kiley is active and so are her kids!  We're not exactly sure what "fly" means to Emily but it's her word.  As parents our job is to raise our kids to know and love God, help others and become independent adults.  So farmer Dan and Kiley are indeed raising Emily to "fly" someday!


Kiley wanted something new and cute for Emily's room...she mentioned it to me, and as a thank you to Kiley for all her help with Brown Bunny this year, I decided to secretly make a couple of things for Em's room.  I'm no artist but I wanted to share the project and share a few decorating ideas...

A painting for her room...a little tree with small flowers, potato prints of leaves and yes "fly"...

I also found two old frames at the thrift store...removed the glass...painted them grass green. 


I cut a piece of cardboard for the back. Next, I found 2 girls skirts at the thrift store and cut out a piece from the front and covered the cardboard. I added this "E" from Joann's Craft Store and hot glued a couple of flowers salvaged from an old bride's veil. I stamped the word "fly" on a piece of ribbon and glued it to the bottom.


For the second frame I wanted to continue the "fly" theme by gluing a nest we found in our yard this spring.  We added 3 small eggs.  I made these clay tags to spell the word "fly" for the bottom. 

Kiley had also hung these fun paper lanterns over Emily's bed...so cute, festive and feather light so no worries if one falls!  Sweet dreams Emily and God Bless you as you learn to "fly"!

Sunday, November 13, 2011

November 5, 2011 - Kaitlin and Jaime's Wedding

I truly do appreciate all of my clients but it is especially fun for me when we have someone that I have known on a personal level.  Kaitlin and her parents have been family friends for many years...it was such a pleasure to work with them on this wonderful event.  Kaitlin's bouquet definitely had a fallish feel but with very different colors.  We relied heavily on these "antique" bluish-green hydrangeas with a tint of raspberry.  We added in magnolia leaves, gardenias, stephanotis and fern curls...so fun!


The groom's boutonniere incorporated the magnolia leaf, hydrangea, fern curl and stephanotis.


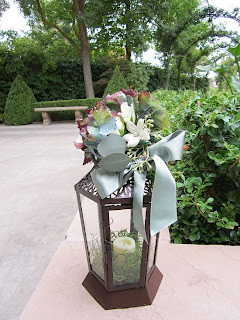
We used the families leaf lanterns to decorate the isle.  Fresh green smilax greenery garlands were added to our standing shepherds hooks.


For the alter table we used the families extra large leaf lantern - loved it!

Inside the pergola at Wolf Lakes Park in the Garden we hung dainty glass floral holders with white and green flowers.


The bridesmaids with their lantern bouquets...such a fun and unique idea.


On the tables we used our brown wooden boxes filled with hydrangeas, green roses, seeded eucalyptus and hanging green amaranthus.


Additional centerpieces included tall vases with green moss balls and manzanita branches. 

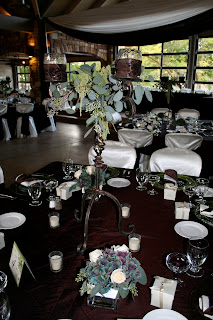
There were 4 larger "captains" tables for the family members - on these we used candelabras and small vases filled with flowers.


The head table was decorated with magnolia, seeded eucalyptus and hydrangeas.


The cake and dessert table was festively decorated with leaf garlands and cupcakes.


November 4, 2011 - Sarah and Zack's Wedding

Sarah and her family came to me during late summer to seek help with their bouquets and a few other items for their fall wedding.  The family would be taking care of the centerpieces and other decorations.  Sarah talked about these metallic looking tiles in 12" squares that the centerpieces would sit on.  I suggested that we use the rich colors of fall to play against the metallic she had chosen.  It all came together beautifully.  The family did a great job of decorating.  Here is Sarah's bouquet - full of saturated color and texture.


We also incorporated hanging green amaranthus into the brides bouquet.

I couldn't help but share these awesome fabric rosettes that Sarah made herself for her wedding dress.  You rock Sarah!

The bridesmaids wore gorgeous dark plum dresses...here are their bouquets.


We made a lush fall arrangement that sat on our candelabra for the guest book table at Wolf Lakes Park.


Guests were asked to write their names on the rhinestones - that were later collected in the bride's vase.


Iron candle holders down the isle with purple and bronze ribbons.


The alter held an elegant hurricane and candle with bronze jewel accents.


We added a few fun fall flowers to each of the families centerpieces.


Here is a detail of those tile sheets I mentioned earlier.  An easy fun idea...pretty sure these were found at a local hardware store.


Our ivory chair covers with new bronze chair bows.